Skip navigation

Tag Archives: DIY

Summer has been a whirlwind of activities for us. Mostly work activities, but still. We’ve spent most of every available day starting new projects, finishing old ones, yard work, garden work, tending our animals, renovations, new school year and little time for extra fun or adventures. Such is the life here occasionally.

The latest project that the littles and I have been working on since mid August is finishing the kitchen floor.

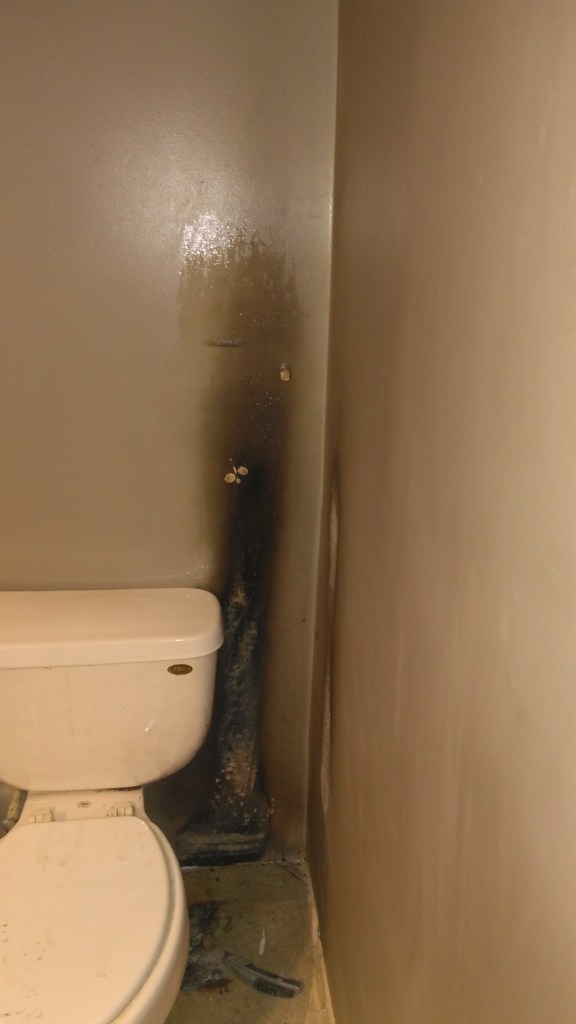
Our foundation is slab-on-grade and the entirety of the main floor is unfinished concrete with the exception of Lil Bit’s room being laminate. Well we did have laminate in the kitchen, but three days after it’s completion we had the chimney fire which ruined the laminate. 🥺 And we have been living with it ever since.

The main kitchen had essentially become a storage space for all our excess: tools, job materials, renovation materials, food storage and junk. Our first order of business was to empty the space out and tear up the ruined laminate. The kiddos were great at this and had it done rather quickly after the arduous task of moving out the stuff which took us a number of weeks.

This kitchen is large, roughly 17′ x 16′ floor space. There’s appliances, including two freezers, that I cannot move out so we had to do the floor in halves. Everything that can’t go outside was shifted to the west side and the eastern half was completely cleared out.

Then the prep work began on the concrete.  Identifying all the cracks that needed repair, we only had two main cracks from all the earthquakes, and a few minor cracks that really didn’t need filled. I fixed those up and began cleaning the slab. Lots of sanding & scrubbing! Unsealed concrete never seems to get fully clean.

Yesterday I began the final scrubbing with the degreaser/cleaner that came with the epoxy paint kit. And two rinses with water and two hours later, the floor was ready for dry time!

Let the fun begin! My helpers were eager to get started. They edged the entire space while I roller, sprinkled and sprayed the finish. Now it’s time to dry. This is the hard part, waiting to use the space that we’ve worked so hard on!!

Had some waste cut-offs from the last job. Decided to repurpose them...

Mercy, it’s been a minute since my last Sourdough post. Fishing comes first, that’s my motto. So back to one of my favorite past times…

I’m always in the lookout for recycled projects. ♻️ Besides being good for the environment, and usually my budget, it’s fun to turn someone else’s trash to my treasure.

I found this set aside at the dump and figured I could repurpose it as a wood burning chiminea. Which will be just right this fall when it starts to cool down and we need to take the chill off whilst sitting outside.

Propane patio heater sans burner assembly

I started by disassembling the pipe and then removed the tabletop. Once those were apart I struggled with removing the poly weight reservoir from the underside of the pedestal. The 4 bolts holding it in place were rusted and fused, two of them pulled right through and the other two wouldn’t budge. I swear the thing was made like Samsonite luggage. It took a minute… Or 20. Wish I’d had a gorilla.

I used a 4″ hole saw and cut out a larger hole to receive the new stovepipe. Side note: A 4″ hole saw is slightly larger than needed for the stove pipe but I didn’t have anything smaller that wasn’t too small, so 4″ it is!

I affixed a starter collar with machine screws and stove mortar.

Then I made a refractory mix with plaster of Paris and perlite to weight the bottom of of the chiminea to keep it from toppling over and give it some heat protection.

Bottom view of the base filled with refractory mix.

I decided to use a metal bucket as the fire chamber inside the stove to hopefully make it last longer. It was Dean’s idea and I went with it. For the bucket I poured refractory mix in the bottom about 2 inches deep and drilled air holes around the bottom. It fits nicely inside the unit.

I let it dry thoroughly before it’s first firing, about 8 days. First fire at the beach, it works!

First firing on the beach. It works!

The refractory mix in the bottom helps insulate the unit quite well. There’s no heat exchanged at all. I used a piece of white paperboard to close a central hole when I poured the mix in. The paper is still intact and not even singed. I honestly think I could use it on a deck. I’m very happy with my landfill rescue.

Cletus decided we needed to make these adorable little gnome garland strands. We ended up with 10 of the turquoise and 11 of the pink/black ones. Two kids made themselves a gnome. And we made three oddball gnomes for variety.

Getting started.
Making my first little gnome hat.

The hats are made by looping yarn around a paper towel tube that’s been cut down into 3/4″ rings, give or take.

The first finished gnome.

The beards are pom-poms glued into the hats. And a wooden bead for a nose.

I’ve never seen so many gnomes.

Cletus’ gnomes
My gnomes.
Cletus’ snow gnome, or just “S’nome”
My high hat gnomes.

They were a fun craft, lots of yarn cutting and pom-pom making silliness.

#crafts #gnomes #notbored #fiberart

Way back in October, Lil Mister asked for a pumpkin when grocery shopping. I asked him why did he want a pumpkin? And he replied because he wanted a pie. So of course we got a pumpkin. It sat on the table for fall decor until Thanksgiving.

Lil Mister’s pumpkin, preparing for the slaughter.

He had bugged me almost daily for a month as to when we’d make his pie. When I told him we were getting the pumpkin ready for pie making he got really excited.

Top off.

I honestly expected him to reach into the seeds and “guts” as we call the pumpkin insides and declare it too gross for him and quit. Well he did say that it felt gross and weird but he persevered. He emptied that pumpkin with some assistance from Lil Bit.

Peeling the pumpkin

Then we started the peeling process, which took a while. He helped until the whole thing was peeled and chunked up. It filled the instapot to the max line. Mom set it to cook and then started in on the rest of Thanksgiving dinner.

Mashing the cooked pumpkin. That’s my cool birthday gift from Mo in the background. She decoupaged some recipes I found out at Dad’s cabin onto an old spoon rack. I can’t wait to put it up in my kitchen!

Needless to say, Mom had way too much to do for Turkey dinner and we decided to let the pie wait until the next day (Mom’s birthday) for pie making.

Lil Mister was bright eyed and bushy tailed the next day, ready for pie making. Mom had to go work on a tile project so Big Sis took the reigns and she and Lil Mister made two pumpkin pies, one gluten free.

They did an amazing job, the pies turned out nicely, even after a last minute adjustment, Big Sis forget eggs in the wheat pie… But it all turned out good.

Sadly, I didn’t get any pics of the finished pies. Trust me that they were delicious and didn’t last long. Mom rather likes pumpkin pie for her birthday. And Lil Mister was super proud of himself for making pumpkin pie from scratch!

#thanksgiving

#kidsinthekitchen

#scratchcooking

We’ve been working on our upstairs bathroom. It’s been partially out of service (the toilet) since early March when we had a smallish fire in the bathroom trash. Thank goodness for keeping fire extinguishers in our home! And for being home due to covid-19 shutdown!

Trashcan fire damage.

We had some drywall repair to do and let’s face it, neither one of us likes to do drywall. So it has been waiting on us to finish it. And finally we’re back to it. I’m tired of only one toilet in the house with 6 people!!

The meantime I’ve been sourcing materials as they go on sale or clearance. So when we were ready we could do the reno for less $$.

Beginning the drywall repairs.

Dean started sanding & applying more mud while I started to strip down the map decoupaged vanity top. I scored the surface and used some fabric softener mixed with water to loosen the paper. Most of it scraped right off after soaking for a while. The rest got a light sanding and then I wiped down the surface with a damp rag.

Next was fitting the tile to the vanity top. I rough cut the tile to fit, now I need to trim the edge pieces to fit the tile into place. I had intended to use penny tile, since it would be easy to fit and no cutting needed. The colors Home Depot had just weren’t right though, and this hex tile was perfect. Plus it was on clearance so I got a bargain deal on all the tile for about $13. Now I’ll be learning a new skill, cutting tile! Yippee!??!?

Rough fit tile.

Dean never has been fond of the dark taupe colored walls so we opted for a sage green color. With accents of beige tile, sable grout (bought on clearance for 10¢ a box!!) and one wood accent wall we hope to add interest to this unusually long, narrow, odd shaped bathroom.

#renonation

#updatedbathroom

#diyAK49

Yesterday we were preparing for our Rosh Hashanah service, and having all these fresh local apples, we decided to make some apple prints!

Painted apples

It was chaotic, messy fun. In other words, normal arts and crafts time around here.

All the things.

Each kiddo, and me too of course, printed two cards. We had fun being creative. And it’s always fun to see how each of the kids has a different interpretation on the assignment.

One masterpiece.

For my student taking botany (Lil Bit) this is her instruction on how to do specimen prints (with ink instead). I’m sure she’ll have an entire notebook filled with leaf prints by the end of the school year.

We went on to create some delicious salads to share at our service. I made this one because I love quinoa salads and this salad with kale instead of spinach (because that’s what I had!). Both were delicious and will be added to our regular menu.

Our service was lovely, adorned with beautiful sunflower bouquets! And delicious food of course. And we begin another year! L’Shana Tova!

Mo’s homegrown sunflower bouquets.

Hang dead critters on the wall of course.

Well, first I had to refurbish my small moose rack.

This is one of the racks that Dad had hanging outside, it was bleached and had some lichen growing on it.

bleached moose rack
bleached moose rack

I wanted to make it look as natural as possible and not “painted”, and I had only a shoestring budge… which is not as easy as it sounds!

I found some brown paint and corduroy pants at the local thrift store for $1.50. I already had some black shoe polish and a board to mount the rack on.

First I brushed off the mossy stuff and then painted the rack with diluted brown paint. After that was dry, I mounted the rack on the board, which I had also painted brown. I used the corduroy pants to cover where I mounted it so it would look a little nicer. And then Dean helped me mount it on the wall.

I think it turned out pretty good, even if I do say so myself…

the finished refurbished moose rack

the finished refurbished moose rack

I also decided to put my bear rug back on the wall. The kids were just too hard on the old boy and were tearing up his hide terribly. He was lonely so I gave him a friend and hung a beaver pelt up with him.

It looks like Alaska around here.

Bear and beaver

Bear and beaver